


Matchflow Mask Portal
Matchflow Mask Portal
Matchflow Mask Portal
Matchflow Mask Plattform mit verschiedenen Abrechnungsformen (Lastschrift, Rechnung, Kreditkarte) (zzgl. Kosten für Kreditkartenanbieter)
Bereitstellung Produktionsabwicklungssystem in Indien, Anbindung dieses Systems an das Portal mittels VPN (Internetanbindung mit mind. 2 MBit wird vorausgesetzt)
Incl. 12 Monate Hosting, Bereitstellung Hardware und Wartung mit einer Verfügbarkeitsgarantie von 98,5% im Matchflow Data Center
Erweiterung des Portals nach Bedarf.
Funktionsbeschreibung MatchFlow Mask Portal:
1 Überblick
Beim Maskenportal „MatchFlow Mask Portal“ handelt es sich um eine Anwendung, über die Benutzer
Bilddateien auswählen und Maskendienstleistern zur Bearbeitung bereitstellen können.
Fertig maskierte Abbildungen werden in das System zurückgeführt und können vom
Benutzer weiterverwendet werden.
Das System arbeitet auf einem oder mehreren Helios Dateisystemen, in denen die zu
maskierenden Bilder abgelegt werden. Als Benutzerschnittstelle dient eine Webapplikation,
auf die alle Nutzer des Systems über einen Webbrowser zugreifen können. Dadurch
kann das System betriebssystem- und standortunabhängig genutzt werden.
2 Ablauf
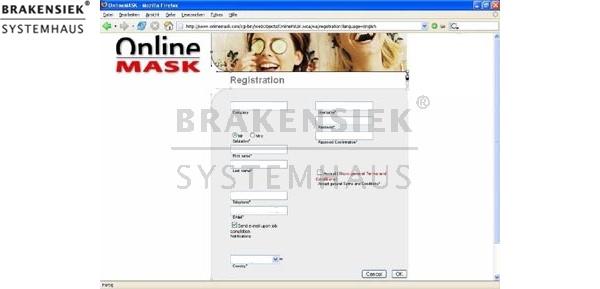
2.1 Registrierung
Damit Sie unseren MatchFlow Mask-Service in Anspruch nehmen können, ist eine Registrierung
notwendig. Diese erfolgt online und wird mit einer einfachen Menüführung unterstützt.
Hier die Schritte im Einzelnen:
a. Wählen Sie auf der Startseite den Button „Registrierung“ aus
b. Richten Sie sich Ihre Benutzerdaten ein. Bestätigen Sie mit dem Button „OK “
c. Sie gelangen jetzt automatisch zu unseren Online- Geschäftsbedingungen. Mit dem
unten stehenden Button akzeptieren Sie unsere Allgemeinen Geschäftsbedingungen.
Wichtig: Sie müssen für jede Maskierungsleistung (z.B Mask-Economy oder Mask-
Comfort) die AGB's bestätigen.
d. Nun können Sie sich mit dem von Ihnen gewählten Usernamen und Passwort anmelden.
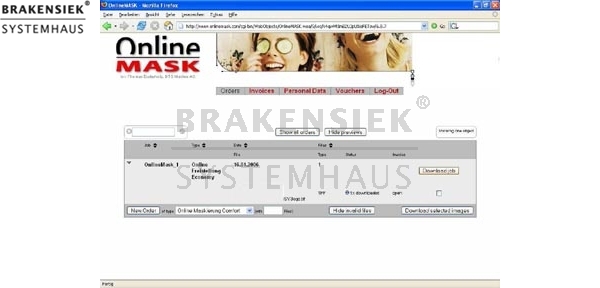
2.2 Bilder senden
Damit wir Ihre Bilder freistellen können, müssen diese an das MatchFlow Mask Portal gesendet
werden. Damit die Fakturierung der erbrachten Leistung anschließend ohne weiteren
Aufwand ablaufen kann, benötigen wir an dieser Stelle Ihre Zahlungsinformation. Sie
können zwischen einem elektronischen Lastschriftverfahren und der Bezahlung mit der
Kreditkarte wählen. Alle Daten werden natürlich verschlüsselt (SSL) übertragen und
werden absolut vertraulich behandelt.
1. Klicken Sie auf "Neuer Auftrag“, geben Sie die Anzahl der hoch zu ladenden Dateien
/Archive ein und bestätigen Sie mit dem Button "Festlegen". Die Dateien landen
schließlich im eigenen Verzeichnis des Benutzers, wobei Archive automatisch dorthin
entpackt werden.
2. Mit "Durchsuchen" können Sie nun die einzelnen Dateien oder Archive auswählen.
3. Vergeben Sie dem Job einen eigenen Namen oder belassen Sie es bei dem automatisch
vorgegebenen Namen. Der Jobname wird später in der Abrechnung berücksichtigt.
4. Bestätigen Sie mit dem Button "Auftrag abschicken". Dies beschreibt den Standard-
Datenversand über http.
5. Informieren Sie sich über weitere Möglichkeiten der Datenlogistik unter dem Punkt
„Details“ und „Die Anbindung“.
2.3 Funktionsweise
Sind die Dateien im System bekannt, so können sie über die Webschnittstelle ausgewählt
und in einen Warenkorb gelegt werden. Hat der Benutzer seine Auswahl beendet, so öffnet
er die Warenkorbseite und erstellt einen Maskierungsauftrag. Dieser Auftrag enthält
alle wichtigen Informationen für die Maskendienstleister. Der Warenkorb wird daraufhin
schreibgeschützt und die enthaltenen Dateien werden den an das System angeschlossenen
Maskendienstleistern zugeordnet. Die Zuordnung erfolgt nach einem Verteilungsschlüssel,
der verschiedene Kriterien, wie die Auslastung der Maskendienstleister, ihre
Priorität oder den Zeitpunkt berücksichtigt.
Ein Maskendienstleister kann in seiner Webschnittstelle die ihm zugeordneten Dateien
sehen. Will er eine Datei maskieren, so schaut er sich zuerst die Auftragsbeschreibung
an und lädt die Datei dann herunter. Dabei wird mit Grobdaten gearbeitet, um das übertragene
Datenvolumen gering zu halten. Die eigentliche Maskierung findet außerhalb des
Systems (beispielsweise mit Photoshop) statt.
Ist ein Bild fertig maskiert, so kann es vom Maskendienstleister wieder in das System
hochgeladen werden. Nachdem das Bild automatisch seiner Ursprungsdatei zugeordnet
wurde, werden die Masken aus dem hochgeladenen Grobdatum in das Feindatum kopiert.
Anschließend wird der Status der Datei verändert, um den Auftraggeber über die
Verarbeitung des Bildes zu informieren. Die Durchführung des Vorgangs wird zu Abrechnungszwecken
festgehalten.
3 Schnittstelle
Wie bereits erwähnt greifen Benutzer über eine Webschnittstelle auf das System zu. In
den folgenden Abschnitten sollen die Funktionen dieser Schnittstelle erläutert werden.
Der Anwender muss sich zuerst am System anmelden. Die Navigation erfolgt immer über
ein Menu, mit dem alle für den Anwender benutzbaren Funktionsmodule aufgerufen werden
können.
3.1 Dateieinpflege
Wenn sich alle zu maskierenden Dateien im System befinden, kann der Benutzer eine
Liste für den Maskierungsauftrag zusammenstellen. Dies geschieht über die Dateinavigation.
Auf der linken Seite des Bildschirms sieht man einen Verzeichnisbaum, mit dessen Hilfe
der Benutzer durch die Verzeichnisstruktur des überwachten Dateisystems navigieren
kann. Auf der rechten Seite sind die im aktuellen Verzeichnis enthaltenen Dateien zu sehen.
Dateien können durch Betätigung eines Buttons in einen Warenkorb gelegt werden.
Warenkörbe sind Sammlungen von Dateien, von denen jeder Benutzer beliebig viele
verwalten (anlegen, ändern und löschen) kann.
3.2 Auftragserstellung
Auf der Warenkorbseite kann der Inhalt von Warenkörben angezeigt werden. Im oberen
Bildschirmbereich befindet sich eine Auswahlbox mit allen verfügbaren Warenkörben des
Benutzers. Im unteren Bereich werden die im aktuell ausgewählten Warenkorb enthaltenen
Dateien dargestellt.
Von der Warenkorbseite aus hat der Benutzer die Möglichkeit, Aufträge zu erstellen.
Nach Betätigung des entsprechenden Buttons wird ein Formular angezeigt, in dem die für
den Auftrag nötigen Informationen (Jobparameter) eingegeben werden können. Bei Maskierungen
kann ein Termin für die gewünscht Fertigstellung, die Art der Maskierung (Freistellung,
Maskierung) und eine optionale Beschreibung angegeben werden. Nach Bestätigung
des Formulars wird der Auftrag im System angelegt und der Warenkorb schreibgeschützt,
so dass sein Inhalt nicht nachträglich geändert werden kann.
3.3 Auftragsüberwachnung
In der Auftragsüberwachung kann der Benutzer sämtliche Schritte, die sein Bild gemacht
hat überwachen. Nach Fertigstellung des Auftrags durch den Maskendeinstleister, erhält
er eine Benachrichtigungs-Email, dass sein Bild zum Download bereitsteht.
3.4 Dateidownload
Nach der Fertigstellung der Maskierung erhalten Sie eine E-Mail, dass Ihr Job zum
Download bereit steht.
Führen Sie folgende Schritte zum Download Ihrer Bilder aus:
1. Wählen Sie ein einzelnes Bild oder einen ganzen Job zum Download aus. Bestätigen
Sie den Download von einzelnen Bildern mit dem Button „Markierte Bilder downloaden“
oder "Download Job", um alle Bilder eines Auftrags herunter zu laden
2. Speichern Sie die Daten auf Ihrem Rechner.
Je nach Betriebssystem startet die Dekomprimierung selbsttätig oder muss manuell angestoßen
werden.
3. Ihre gesendeten Bilddaten werden maximal 4 Wochen auf dem System für Sie bereitgehalten.
Aus Kapazitätsgründen müssen wir die Bilder nach Ablauf dieser Frist löschen.
Die fertigen Jobs werden maximal 8 Wochen gespeichert.
4 Bezahlung
Eine Rechnung wird zum letzten Tag des Monats automatisch generiert. Es besteht auch
die Möglichkeit, bei größeren Volumen auf wöchentliche Abrechnung zu stellen.
Führen Sie folgende Schritte aus, um online zur Ihrer Rechnung zu gelangen:
1. Wählen Sie den Button „Rechnungen“ aus.
2. In der Übersicht können Sie sich Ihre Rechnungen als PDF downloaden.
3. Damit Sie sich jederzeit einen Überblick über den von Ihnen in Anspruch genommen
Service von MatchFlow Mask Portal verschaffen können, bitten wir Sie, sich Ihre Rechnungen am
Ende des Monats als PDF-Datei abzuholen.
Sobald eine Rechnung erstellt wurde, benachrichtigen wir Sie per E-Mail.
* Zusicherungen und Markennamen:
Die Beschreibung und die eventuelle Nennung von Markennamen dienen lediglich der allgemeinen Identifizierung der Kaufsache und stellen keine Gewährleistung oder Zusicherung im kaufrechtlichen Sinne da. Wir stellen unmissverständlich klar, dass wir kein Nutzungsrecht an den Markennamen durch den Markeninhaber eingeräumt bekommen haben. Markennamen sind rechtlich/gesetzlich geschützt und dienen hier lediglich der Produktbeschreibung. Die Angaben erheben nicht den Anspruch auf Richtigkeit und Vollständigkeit. Irrtümer und Zwischenverkauf vorbehalten. Die gemachten Angaben, die Beschreibung und die Bilder sind unverbindlich und dienen nicht als zugesicherte Eigenschaft, sofern nicht ausdrücklich erwähnt. Der Verkäufer übernimmt weder Haftung noch Gewährleistung für Tipp- und Datenübermittlungsfehler. Ausstattungen sowie Extras sind gegenenfalls gesondert bei der notwendigen ausführlichen Besichtigung des Kaufgegenstandes zu überprüfen. Änderungen und Zwischenverkauf vorbehalten. Die Artikelbeschreibung stammt von der Herstellerwebseite. Alles was in Zitatzeichen " " ist ist direkt zitiert und bzw oder ein vermuteter Markenname. Bitte kontaktieren Sie uns über das Kontaktformular, wenn Sie einen Markenrechtsverstoß bemerken. Wir werden dann unverzüglich diesen beseitigen.
Ähnliche Artikel

matchflow pps
matchflow pps matchflow GmbH & CO. KG hat eine neue Software namens matchflow PPS entwickelt mit der Sie die Zeiterfassung über Zeitstempel und Tätigkeitskategorien Projekten zuordnen können. Es gibt eine Mitarbeiteransicht und eine Chefansicht. D...

matchflow-adjust
matchflow-adjust THE PROBLEM: The cosistent and in due time vote of pressure projects between agency, media service provider and the marketing department of the customer is time-consuming, buggy and cost-intensive. THE SOLUTION: matchflow-adjust op...

matchflow optimizer
matchflow optimizer * Zusicherungen und Markennamen: We are not authorized reseller of this brand we use the names only for description ...

MatchFlow Qualitätsprüfung
MatchFlow quality inspection Quality inspection of the export data from picture data banks, article data banks of your available solution ERP or your suppliers and feasibility check whether that in MatchFlow ERP can be imported. In the area of the...
 Unser Partner ist die